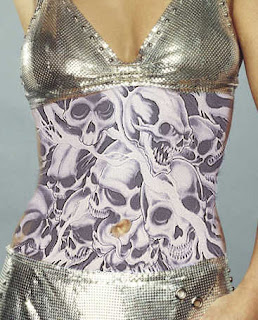
Page 1 : Geri Halliwell
We'll use my recent Geri Halliwell image as the template for this tutorial. Bikini clad, light skinned people are the easiest to make this rather simple but very effective bodyart.
Page 2: Flash Sources
The source artwork I use for tattoos is the "flash" artwork that real tattoo artists design and use as a templates for their work. Walk into most tattoo parlours and hanging on the wall or in their design books you'll see a huge selection of artwork you might want to have a tattoo of.
So just Google Image Search with the keywords tattoo + flash and you'll find ample sources to use. Be sure to use an image that is public domain (or ask the author first). It's possible to cut and paste tattoos off the body or image of a person and use different blending methods to achieve a similar effect, but it is very time consuming and much more difficult to get good results. For Geri's arms, legs and torso I used just 3 pieces of flash artwork.
Page 3: Position and Multiply
Let's start with Geri's abdomen and the skulls artwork, just drag the image over her abdomen and apply a mask to the skulls layer. Using the Move tool roughly place the artwork where you want it to sit, using the Transform option stretch/perspective, etc. to get better placement. Mask out the areas where you have any overlap, return to the Move tool if need be and Transform it to your liking using its different settings, I ended up with this. Some people have used displacement maps to align tattoos, not once have I required them.
All you have to do next is click on the image thumbnail in the layers palette and alter the blend mode from Normal to Multiply. Simple as pie! because most flash artwork is on a white background selecting Multiply will cause the white background to instantly disappear,leaving you with the coloured or in this case black artwork blended to Geri's abdomen. Tattos are never a solid black so tweaking the layers, colour balance and lowering the opacity makes for a very realistic effect.
Page 4: Joining patterns
The same process was used on Geri's arms and legs. a single piece of flash artwork was duplicated and used on 4 or 5 layers, masking, resizing and using the Multiply on each layer. Because the arms and legs had the same pattern I just placed the lower arm and the upper arm layer over the top of each other and masked out any overlap creating a smooth pattern.
The image below shows the 3 layers used with some masking and a pretty good flowing pattern as achieved. Seems a little messy but remember once the Multiply blend is applied all the white instantly disappears.
Page 5: Transformation
For Geri's shoulders and chest area, again a repeat of the previous process, just a different piece or artwork was used and it was duplicated onto 2 layers, then one was horizontally flipped for left and right.
For some body parts you might consider using the liquify tool in moderation if the Move/Transform/ Distort option is not achieving the desired "fit". I also mask certain areas with a low opacity brush to achieve a feathered smooth flowing ink effect. You wouldn't want a solid colour to apply to areas in a body cavity or around the edge of a shoulder.
Page 6: Coloured tattoos
Finally, for coloured tattoos pretty much the same techniques are used as for black ink work. A little extra work is involved adjusting the opacity of the layer to get that blurred well worn effect, you don't want too vibrant a colour or you will not get that see-through ink applied to skin look. I sometimes use Adjustment layers and the Replace Colour option to lessen a red or to make a green more vibrant.
So basically there you have it, there is nothing too difficult to creating bodyart.
1. Use "flash" source images
2. Use Multiply for your layers
3. Use the Transform option to position and distort the tattoo.
4. Be a little creative and play with the colour and opacity settings.


No comments:
Post a Comment